Refashioning Clothes: How To Design & Sew Easy Zero Waste “One New From Two Old”

By Mariana Kirova
If you want to start refashioning clothes today, the zero waste design technique is your way to go.
It will effectively prepare you for easy, yet wonderful refashions without the need of any special garment construction skills.
This tutorial explains the three "how to" stages, with supporting videos, pictures, tips and detailed instructions.

Along this project you will learn:
- How to make sleeves only by tracing an armhole of a garment;
- How to do a coloured rolled hem with just 1 coloured spool;
- How to make a gather only by using straight machine stitch.
Zero Waste
The inspiration for this refashion comes from a very interesting and becoming quite popular method in garment construction, called zero waste.
Zero waste approach simply indicates that when a garment is designed or made there is no fabric leftover at the end of the process.
As general rule, garment manufacturing creates about 15-18% textile waste. This triggers finding different, sustainable ways and many professionals use zero waste strategies when developing a garment or making its pattern.
Zero waste can be approached from different angles, in various garment development stages - in the designing phase, when developing the pattern or in the cutting stage. The main idea is to create clothes with no or very little textile leftovers when the clothes are produced.
Going back to today's project, in zero waste terms the "one new from two old" aims not only to arm you with great easy refashioning technique. It also comes to show how the garments we transform can be used entirely, without any or at least with only tiny bit of wastage.
I must admit, zero waste could be a great challenge, but the good part is that:
Refashioning clothes can become even more sustainable by using the zero waste design approach
How To Design & Sew Easy Zero Waste
"One New from Two Old"
Tools & Materials:
- One sleeveless garment (knit or woven)
- One shortsleeve blouse that drapes well
- Corresponding colour thread
- Tape measure
- Air erasable pen/marker
- Basic sewing tools
- Sewing machine
- Optional: an overlocker / serger

Stage 1: The Design Process
The first thing in the zero waste “one new from two old” strategy is to determine the final design. Everybody who's ever tried design a garment knows it could be a deeply personal and intuitive process. It involves designer taste, aestetics, but also unconsiousness that keeps previous memories, emotions, the long term developed experience or previous exposure to other interesting items, ideas or even garments. However there are some things we can learn and relate to in this design stage. Here is the fun, most undefinate part in which trying different options is a must;).
For today's project begin with figuring out the three most important things about the design:
- The colour combination
- The design elements & lines
- The embellishment
Choosing The Colours
You don’t have to be familiar with the elements of design to know that colour is very powerful. It surrounds us everywhere where there is a light. In garment design colour is one of the most important design element that can have critical role for obtaining certain look.
The best way for me to visualize when designing is simply to put materials I'll use close to each other. That helps heaps when you are trying to find the final colours that would go best together.
In this project I’m choosing bright warm fuchsia colour as my main refashioning garment (in the middle of the picture). This was my design starting point. I spot the same colour rabbit fur scarf at the same time when I found it in the thrift store.
The second item could be within any preferable colour combination. At the beginning I considered the silk dress within the warm red colour palette which generally matched well (right on the picture). However, these colours were too heavy and intense for me. Thus my final choice is actually to brake the bold fuchsia with supplementary colours. The unwanted semi-sheer polyester fad with white, blue, dark and red print mix creates different, fresh, lighter and interesting colour combination.

In the middle is the main garment. On both sides - the two options from which I'm choosing the left as a supplementary garment
TIP: Find your raw materials at the same time
To make your task easier, you can look around and find all the materials while still in the thrift store. After finding the main garment, dig for the supplementary one and, also, if there’s anything interesting to add as an embellishment. It's unforgivable to miss out all the great choice there and available variations, isn't it?
Choosing The Design Elements
The mix of different colours make it really easy. It allows design lines and elements to be very simple. So without any complicated cutting or detailing the final result still will be quite powerful thanks to mix of colours. The secondary blouse will be cut across, hence the printed hem area
will become skirt extension of the new tunic dress. The rest (the sides) I’ll use to make sleeves. And finally, whatever left from the blouse, I’ll use to embellish.
The Embellishment
The material of the second garment is soft and fine semi see-through polyester. It has great draping qualities - ideal for fine fabric manipulation. At this stage rough idea how to embellish
with the remnants is fine. After all considerations, I decide to make flowers “as-I-go” to embellish the fuchsia top at the chest area. Also I’ll add pieces from the rabbit fur scarf - on the sleeves and centre of the flowers.
Stage 2: Constructing The Garment
There are two main steps here:
- Sew the skirt extension
- Make the sleeves
Sewing The Skirt Extension
Cut the secondary garment across. Then attach the skirt extension to the main top.
The main garment from today's project is a vintage type of silk and wool blend, fine sweater knit fabric. It has great stretch in it and attaching the other material could be a challenge for less experienced in working with stretch materials. However, don’t leave that to push you off! Instead, give it a try and you may succeed with nice outcome. At least, the try can only benefit you in the long run, having the experience working it around will be really valuable.
However, if you don’t feel confident enough, you can substitute the knit top with a woven one. Then you'll have both materials less challenging and you'll still have a beautiful refashion project “one new from two old” at the end;).
TIP: Adjust the tension settings on your sewing machine
Decrease the tension between the presser foot and the feed dogs of your sewing machine to avoid puckering the seam when sewing the knit material (hem and sleeves).
To do the settings loosen the tension knob for the presser foot. Looks a bit different on every machine, but is always located vertically of the presser foot mechanism (on top of the machine, at the front, on the side). In the machine manual find how to set the tension knob for different fabric thicknesses - choose the one for medium to heavy fabrics. Don’t forget to turn the tension back when you finish;)
Make the gather
The best way to attach the non-stretch woven material to the knit with good stretch characteristics is to make a gather to the non-stretch one. The simplest way to do the gather is by sewing two parallel lines along the edge.
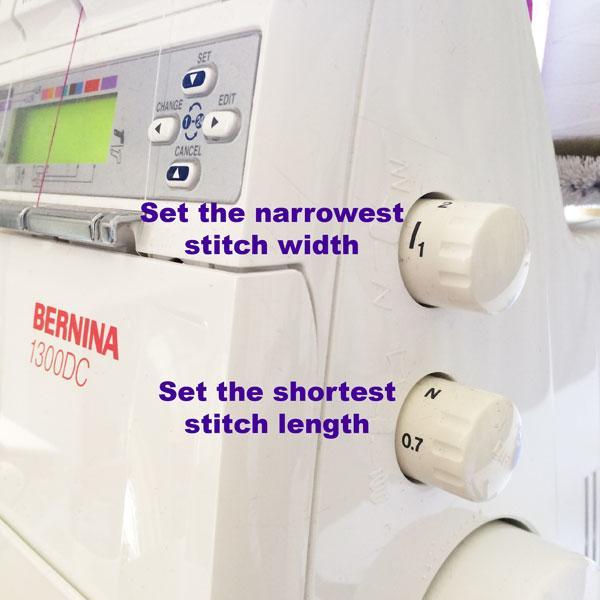
First, set the longest stitch on your sewing machine. Then make two parallel stitching lines along the raw edge all around the skirt extension (top section). Sew the first line on approximately 0.5cm (1/4in) from the edge, the other about 1.5cm (5/8in) from the edge. You don't have to be precise as at the end the thread is removed.
NOTE: After sewing the two gathering lines, return your stitch length settings to the normal for regular sewing ;)
After sewing the two lines, pull the bobbin thread of both stitching lines together. Then match the hem of the main garment with the gather of the extension and pull them together to make their length the same. Pin to secure the matching points. Check the video how I matched the skirt extension to the main hem (I did separate stitching lines for the front and the back, but you can simplify with having two lines for the entire circumference).
Below is the video how to spread the gather before sewing the skirt extension:
When you are ready, go to the next step.
Attach the skirt extention
The type of the joining seam here and next, for the sleeves, is optional. You can choose an overlocking finish and then attach with a top stitch with knit hem on the top. First I've chosen that, but lately I changed it and for cleaner finish I choose similar to flat felled seam.
To do it place the wrong sides of the two materials together with the gather piece on the top. Sew a 0.5cm (1/4in) from raw edge of skirt extension, but match inner stitch of main garment. After sewing a little bit check how it looks (should be flat, yet still stretchy, not puckered or pulling, check the photos below). If needs, re-adjust the settings of your sewing machine and then continue.
NOTE: If you're happy with your seam, now you can remove the gather stitch. But it's vital you pull the same bobbin threads you pulled to make the gather. Otherwise, you'll seal/knot the seam and removing the thread will be a big challenge! So be careful and take your time here. Pull only if you are sure which thread you got.
When finish, open the seam with right side up, with the hem of the main garment on top. Top stitch on a bit more than 0.5cm (1/4in) parallel stitch. That will seal the skirt extension's raw edge and will deliver a nice, clean seam finish.

The sealed seam finish inside (wrong side)

The finished seam on the right side (on top of main garment hem)
Below you can check the video how to attach the extension:
Making The Sleeves
As many things you can do in sewing (and still look professional), here sleeves can be done in few different ways. They can be draped on a mannequin, drafted from specific measurements (creating a pattern), done from an existing sleeve pattern, or done more freely by tracing the main garment armhole.
I wanted to do the fastest method, therefore I did trace the main garment armhole (see the instructions below). Anyone with some experience working with sleeve patterns should be fine with this method. Additionally, the gather on 1/3 at the sleeve top gives enough freedom for small corrections on the go.
The main thing is to give enough room at the sleeve head top, so the sleeve can lay on the shoulder without pulling. Therefore, the gather on the sleeves is not only a design decision for the new garment, but most of all a fitting solution. To make the second sleeve, mirror trace the first. Measure the length of both sleeves to ensure they are a pair.
The Sleeves
To create the sleeves from the main garment armhole start with placing the two garments flat with the main under. Set both materials - match the underarm point and start marking the sleeve from there. Use an air erasable pen or marker. Follow the 4 steps from the pictures below.

1. Trace the armhole of the main garment underneath to the other on the top.

3. Mirror transfer on the other sleeve to make a pair.

2. Put flat and finish marking the armhole/armscye curve, then cut.

4. Ensure you have pair of sleeves with same sleeve length.
Sew the sleeves the same way, by using the same seam that you used for the skirt extension. Spread the gather on the top part of each sleeve. Follow the above instructions and videos for the gather and the seam. And don't forget, the gathering lines are done on the longest stitch machine settings, but turn to the default settings right after sewing those gathering stitch lines.
NOTE: When you finish sewing the skirt extension and the sleeves, don't forget to turn on to previous presser foot settings (those that decrease the tension between the presser foot mechanism and the feed dogs of the machine, you've changed to prevent the knit from stretching while sewing). Check the tip above, right after "Stage 2: Constructing the garment")
Alternative options for the sleeves
- You can choose a secondary garment with sleeves which you can add to the main top. Ideally this sleeve will have about 10cm/4in longer armscye, so the supplementary garment could be a bigger size or a design with wider sleeves.
- You can draft a sleeve according to the main garment armhole measurements and add gather to the pattern (sleeve pattern making coming soon;).
If you manage up to this stage, then you are almost done. The most difficult part is behind you. All that follows from now on is pure fun;). It's time for the embellishment.
Stage 3: Apply The Embellishment
Make The Embellishment
The leftover material I'm using to make flowers as an embellishment. This also will brake down the fuchsia colour a bit and make the tunic more interesting.
Cut rectangular pieces from the remnant cloth maximum 20x10cm (8x4in) or smaller. It is effective, if on each piece you apply overlocker seam, particularly rolled hem finish. Alternatively, leave the edges raw.
The Overlocker Rolled Hem
Every overocker is different, but there are two main settings to adjust for rolled hemming:
Reduce BOTH stitch length & stitch width
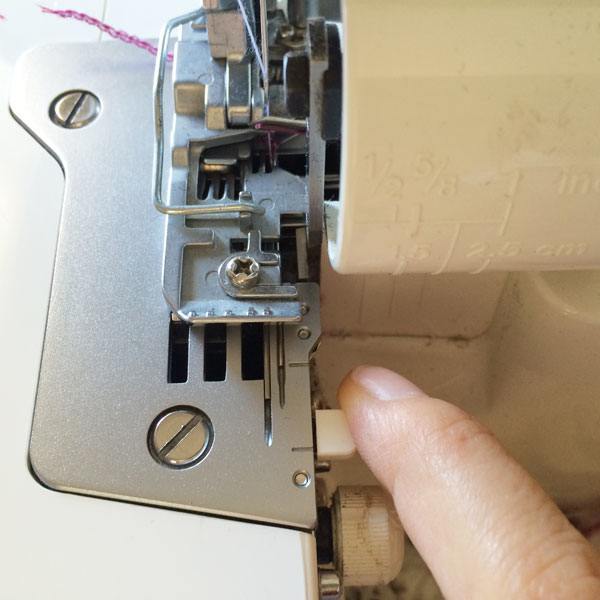
You may need to adjust the selection lever (for Bernina overlocker, on the pic); or to increase the lower looper tension & decrease the upper looper tension. Check you machine manual for special adjustments if needed.
TIP: Make same colour rolled hem ONLY with 1 same colour spool
Usually, to do a rolled hem on the overlocker you have to have 3 spools from the same colour. However, I don’t expect you to have them, neither I have so many. Nevertheless, if you put the colour coordinating spool in the middle of the overlocker (as the upper looper), you will end up with most of the seam covered in that colour. The rest fill with any other basic colours that match your project (white, black, red, etc.)

Set the colour coordinating thread as the upper looper (middle thread)
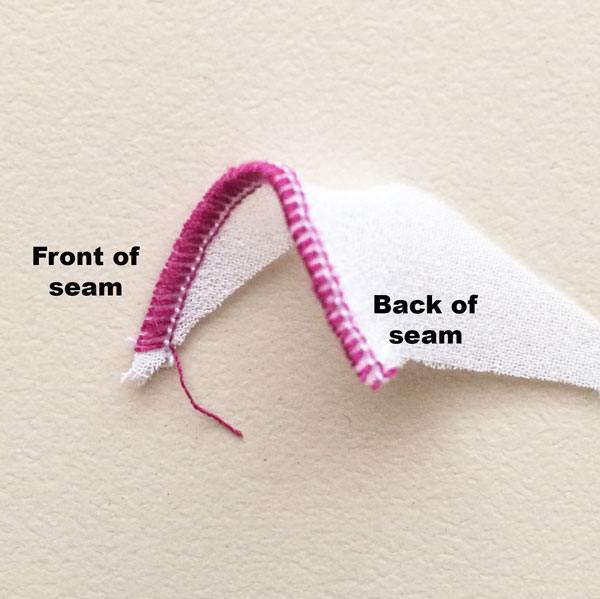
The front and the back of the rolled hem finish
The Flowers
After overlocking the pieces, make the flowers “as-you-go”. Fold them freely in a circle until you are satisfied with their look - see in the video how I make them.
Awesome way to use all leftovers in your zero waste upcycle project!
Attach The Embellishment
Machine stitch every flower separately, on several places before adding to the garment, so it can hold its shape. Next, machine stitch and attach to the garment. Stitch only on some places, just enough to secure the flowers without oversewing them and loosing the 3D effect. Similarly to this refashion with lace flowers, but without the fusible, as here the embellishment is less and not that heavy.
At the end hand sew and attach the rest of the embellishment if you have any. In my case I stitched few pieces from the rabbit fur scarf.
Alternatively, look for trims, buttons or anything suitable in your stash and go wild;) And don’t forget to think about washing the garment. I’m not saying you have to wash it though;).
Just whatever you use at this stage, make sure the embellishment will be find to be laundered (turning inside out and washed in a laundry bag for fine garments - these would be the washing instructions for my project here).

Pinned variations of the embellishment before the final look
Refashioning Clothes:
The Finished “One New From Two Old” Project

Your end result will be different, of course, and I'm sure will be amazing! Most of all, the design here displays how easy, yet productive the zero waste method could be for refashioning clothes. This tunic dress is done only from two thrifted women's tops and a rabbit fur scarf (for a little bit of fluff enchantment). To make the best use of the leftovers from the multicolored top - I played a bit and make the flowers for the embellishment.
The main body material is fine sweater knit, blend of natural silk and wool fibres - comfortable yet great looking dress. I like that the tunic dress can stretch, which gives it versatility to fit different body shapes. No more struggle if I put few kilos next winter. ;)
More...
The zero waste leftovers ;)
As mentioned above, the zero waste design approach could have any or very little fabric waste. Look how my project ended up;) With just a smidge of leftover material, a strip from the neckline of the second garment I cut.
I hope now, since you know about the potential of zero waste, you will look your sewing projects differently. Reworking unused garments can be original, but also excitingly sustainable at the same time, right?
However, my best thing I'm taking from this tutorial making experience is the great fun (and the hard work too;) from tapping onto videos! This are my first three videos I've ever made! And I really hope they were useful and you liked them. Of course, even now I can see lots of room for improvement and, I'm sure, this will come in near future.

Leftovers from the project
However, I'd truly appreciate your feedback on the videos. Please let me know in the comment section below. Tell me how do you find the videos, do you like them or what could I add to them to make it better for you to understand. Thank you!
You can subscribe to the Eco Fashion Sewing Youtube channel and access all videos exclusively, without waiting to be published anywhere else! What's better than this great entertaining way to inspire your creativity for more?
Here's to your passion for sewing and fashion,
Mariana ;)
I love when you love it and share it!
you could make a tube of the skirt portion and attach it to the knit in four evenly matched sections, then stretch the top to fit the bottom as you sew straight stitch. then shrink the top back to size using steam, and the skirt is gathered and the seam is stretchy and will not break the seam if it’s stretched. I do this a lot.
Never thought to use the steam for that, looks great time saver. When I stretched the top here, though, was puckered, therefore used the gather. And the top has wool, which could be damaged with the hot steam. But I like your way and will definitely give it a go on another knit material.
Thank you for your comment, Kitty!
Mariana
You’re welcome for sure. I admit, I use it to add a skirt to Tshirts that I’ve stained and want to get more use out of. Then I have plenty of Tshirt dresses to wear as nightgowns, They wear real well and are very comfortable. LOL
Nightgowns, great idea, Kitty! Nice to see you back;) Have a great day.
Hi Mariana,
Is this you in the videos?? :)) Good body of work here. Can you explain to viewers how you achieved a ‘stretch’ in the pink top, when using straight stitch? Did you stretch it a little as you sewed with a largish stitch; the video doesn’t describe. A normal straight stitch would not stretch easily. I’ve used zig-zg loosely for similar. There is also elasticated thread possibility; as well as a hand sewn stretch-stitch method.
Yes, Amelia. Actually I didn’t stretch it. The “stretch” is done by the tension between the foot and the feed dogs. However, it needs a bit of adjusting – if it’s at “normal” position the knit top will stretch more than it should and will puckered, if the tension is “too loose” then the pink top will loose its previous stretch. So loosen that foot-feed dogs tension a bit actually helped me to achieve that result (I don’t stretch as you see in the video).
But, let’s not forget, as you mention, there are other ways to keep the stretch and have beautiful seam at the end.
Thanks for your comment, really detailed (I like details;)!
Mariana
[…] Do you feel inspired to go out and start digging through the racks? I hope so! Mariana left a comment with a bonus 6th tip that I love: “While you’re in the store and you love […]
You need tips to avoid being overwhelmed when thrifting? Stephanie has very helpful article on her blog – just follow the link above “Tips for Thrift Shopping to Upcycle and Refashion”!
Thanks for including my suggestion too, Stephanie;)
You are amazing, Mariana. I have to admit that I’ve had plenty of wastage from some of my refashions. Lots of food for thought in your post. Aiming to have zero waste is so much more eco friendly than just refashioning by itself.
You are absolutely right, Pam.
It’s quite a challenge to use all the wastage when refashioning. There are some great piecing techniques that could help us… it’s work in progress, I think.
Thanks for your great comment, Pam.
Mariana
Just beautiful